

Conditional Logic
Create dynamic product forms that respond in real-time. Show relevant fields, hide unnecessary options, and guide customers through a personalized shopping experience — automatically.
Conditional Logic transforms static product forms into intelligent, responsive experiences. Instead of overwhelming customers with every possible option, you show only what matters based on their choices.
When a customer makes a selection, related fields appear instantly. When they change their mind, irrelevant options disappear. No page reload. No confusion. Just a smooth, guided purchase flow.
Core Capabilities
- Instant Show/Hide -Fields appear and disappear immediately as customers interact. No page refresh needed — changes happen in real-time with smooth transitions.
- Smart Rule Builder – Create conditions using simple dropdown menus. Select a trigger field, choose an operator, set a value. No coding required.
- Multiple Conditions – Add multiple conditions to create complex logic rules. Each condition is evaluated independently, and the field shows when any condition is met.
- Works With Most Fields – Apply conditional logic to most field types including Text, Number, Textarea, Select, Multiselect, Checkbox, Checkbox Group, Radio Group, Date Picker, Time Picker, Color Picker, Color Switcher, Image Switcher, Text Switcher, Switch, Slider, and more.
Note: Conditional logic cannot be applied to Heading and Paragraph fields (display-only fields). Additionally, Heading, Paragraph, Hidden, and File Upload fields cannot be used as trigger fields in conditions.
How It Works
Conditional Logic follows a simple three-step process:
- Step 1: Trigger – Customer takes an action — checks a box, selects an option, enters a value, or changes a quantity.
- Step 2: Evaluation – The system evaluates your condition rules. Is the trigger field equal to the specified value? Greater than? Not equal to?
- Step 3: Result – Based on the evaluation, target fields instantly show or hide. The form adapts to the customer’s choices.
Simple Example
Imagine a jewelry product with optional engraving:
- Before: Customer sees a checkbox “Add Engraving (+$10)”
- Action: Customer checks the box
- After: Engraving text field and font selection appear immediately
The customer only sees engraving options if they want engraving. Clean. Simple. Intuitive.
Quick Start Guide
Get conditional logic working in 5 minutes.
- Step 1: Access Your Fields – Navigate to WooCommerce → Products → Extra Product Addons in your WordPress admin. Open the addon containing the field you want to control, or create a new addon.
- Step 2: Select the Target Field – Click on the field that should show or hide based on conditions. This is the field customers will see (or not see) depending on their choices.
- Step 3: Open Conditional Logic Tab – In the field settings popup, click the “Conditional Logic” tab. This is where you build your visibility rules.
- Step 4: Enable Conditional Logic – Toggle the “Enable Conditional Logic” switch to ON. The condition builder interface will appear below.
- Step 5: Build Your Condition
- Configure your first rule:
- Field: Select the trigger field (the field that controls visibility)
- Operator: Choose how to compare (Equal To, Not Equal To, Greater Than, etc.)
- Value: Enter or select the value to match against
- The condition reads: “Show this field if [Field] [Operator] [Value]”
- Configure your first rule:
- Step 6: Add More Conditions (Optional)
- Click the “Add Condition” button to add additional conditions. Each condition is evaluated independently — if any condition is met, the field will show.
- Step 7: Save and Test
- Click “Done” to close the field settings. Click “Save” to save your addon. Visit your product page and test the condition by interacting with the trigger field.
- Pro Tip: Start with a single, simple condition. Once it works, add complexity gradually.
Condition Types & Operators
- Comparison Operators
- Equal To – Field value exactly matches the specified value. Use for exact matching like dropdown selections or specific text.
- Example: Color field equals “Red”
- Works with: All field types
- Not Equal To – Field value does not match the specified value. Use for exclusion logic.
- Example: Size field is not equal to “Small”
- Works with: All field types
- Less Than – Numeric value is below the specified number. Use for upper limits.
- Example: Quantity field is less than 100
- Works with: Number, Slider fields only
- Less Than or Equal To – Numeric value is at or below the specified number. Includes the threshold value.
- Example: Hours field is less than or equal to 8
- Works with: Number, Slider fields only
- Greater Than – Numeric value exceeds the specified number. Use for quantity thresholds.
- Example: Quantity field is greater than 50
- Works with: Number, Slider fields only
- Greater Than or Equal To – Numeric value meets or exceeds the specified number. Includes the threshold value.
- Example: Quantity field is greater than or equal to 10
- Works with: Number, Slider fields only
- Equal To – Field value exactly matches the specified value. Use for exact matching like dropdown selections or specific text.
- Field Compatibility
- Fields That Can Have Conditional Logic Applied:
- Text, Number, Textarea, Password
- Select, Multiselect
- Checkbox, Checkbox Group
- Radio Group
- Date Picker, Time Picker
- Color Picker, Color Switcher
- Image Switcher, Text Switcher
- Switch, Slider
- File Upload (can have conditional logic, but cannot be used as trigger)
- Fields That Cannot Have Conditional Logic Applied:
- Heading (display-only field)
- Paragraph (display-only field)
- Fields That Cannot Be Used as Trigger Fields:
- Heading (no user input)
- Paragraph (no user input)
- Hidden (no user interaction)
- File Upload (cannot be reliably compared)
- Note: Textarea fields CAN be used as trigger fields. They work the same way as Text fields – requiring exact value matching with “Equal To” or “Not Equal To” operators.
- Important Notes:
- Text-Based Fields (Text, Textarea, Password)
- Require exact value matching
- Case-sensitive comparison
- Use “Equal To” or “Not Equal To” operators only
- Can be used as both trigger fields and target fields
- When used as trigger fields, the entire textarea content must match exactly (including line breaks and whitespace)
- Numeric Fields (Number, Slider)
- Support all operators including comparison operators
- Values are compared numerically
- Selection Fields (Select, Radio, Checkbox, etc.)
- Use “Equal To” or “Not Equal To” with exact option values
- Values must match the option label exactly
- Multiple Conditions
- When multiple conditions are added, the field shows if ANY condition is met
- Each condition is evaluated independently
- No AND/OR toggle — all conditions use OR logic by default
- Text-Based Fields (Text, Textarea, Password)
- Fields That Can Have Conditional Logic Applied:
Real-World Examples
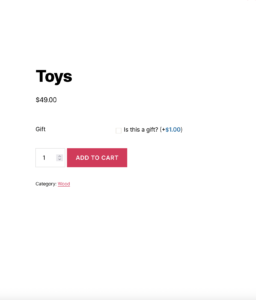
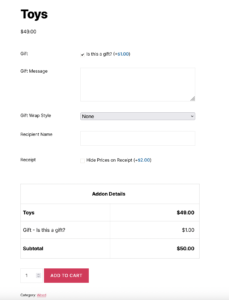
Gift Shop: Gift Message Field
Scenario: Show gift message and wrapping options when customer indicates the item is a gift.
Configuration:
- Target Field: Gift Message (Textarea)
- Action: Show this field
- Condition: “Is This a Gift” checkbox → Equal To → checked
Customer Experience:
- Before: Customer sees only the “Is this a gift?” checkbox
- After checking: Gift message textarea and gift wrap options appear instantly
Additional Fields to Show:
- Gift Message (Textarea)
- Gift Wrap Style (Select)
- Recipient Name (Text)
- Hide Prices on Receipt (Checkbox)
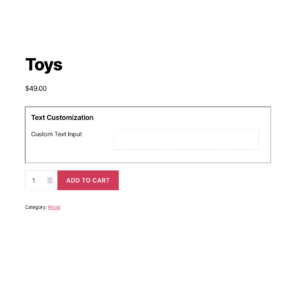
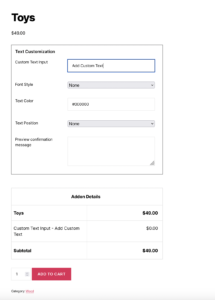
Custom Apparel: Text Customization
Scenario: Show text input and font options when customer selects “Add Custom Text” option.
Configuration:
- Target Field: Custom Text Input
- Action: Show this field
- Condition: “Customization Type” → Equal To → “Add Custom Text”
Customer Experience:
- Before: Customer sees customization dropdown with options (None, Add Custom Text, Add Logo)
- After selecting “Add Custom Text”: Text input field, font dropdown, and color picker appear
Chain Additional Conditions:
- When text is entered, show:
- Font Style (Select)
- Text Color (Color Picker)
- Text Position (Select)
- Preview confirmation message
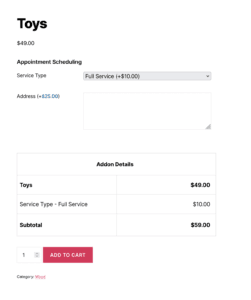
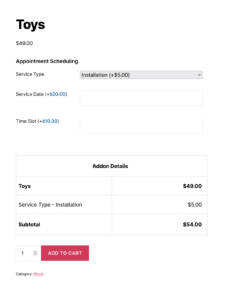
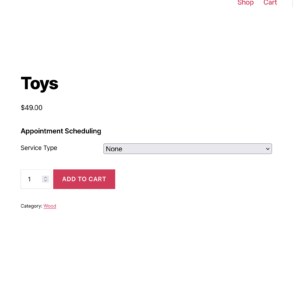
Service Business: Appointment Scheduling
Scenario: Show scheduling fields when service requires on-site installation.
Configuration:
- Target Fields: Date Picker, Time Slot, Address
- Action: Show these fields
- Condition: “Service Type” → Equal To → “Installation”
Customer Experience:
- Before: Customer selects service type from dropdown
- After selecting “Installation”: Date picker, time slot selector, and address fields appear
Extended Logic:
- If “Remote Support” selected → Show screen sharing consent checkbox
- Second, If “In-Store Pickup” selected → Show preferred location dropdown
- If “Delivery” selected → Show address and delivery instructions
Best Practices
- Do This
- Keep conditions simple and logical. Start with single conditions before combining multiple rules. Complex chains are harder to test and maintain.
- Test all possible combinations. Before going live, test every path through your form. Check what happens when customers change their minds mid-selection.
- Use clear, descriptive field labels. Customers should understand what each option does without needing to experiment.
- Group related conditional fields together. Place fields that appear together in logical visual groups.
- Document complex logic. For sophisticated rule sets, keep notes explaining the intended behavior for future reference.
- Consider mobile users. Test touch interactions and ensure conditional fields don’t create jarring layout shifts on small screens.
- Provide default states. Decide whether fields should start visible or hidden, and design accordingly.
- Avoid This
- Don’t create circular dependencies. Field A showing Field B which shows Field A creates infinite loops.
- Don’t over-complicate. If you need more than 3-4 conditions on a single field, consider restructuring your form.
- Don’t hide critical information. Required legal notices or essential product information should remain visible.
- Don’t forget edge cases. What happens if a customer selects an option, fills fields, then changes the original selection?
- Don’t ignore performance. Excessive conditions on many fields can slow page responsiveness.
- Don’t make required fields invisible. If a hidden field is required, customers get blocked by something they can’t see.
- Don’t use text fields for complex matching. Text fields require exact matches — use selection fields (dropdown, radio) for better reliability.
Troubleshooting
Field Not Appearing When Condition Is Met
- Check trigger field name. Ensure the selected trigger field matches exactly. Field names are case-sensitive.
- Verify operator selection. “Equal To” requires exact match; ensure you’re using the correct operator for your field type.
- Confirm comparison value. The value must match exactly what customers select or enter. Check for extra spaces or different capitalization.
- Ensure conditional logic is enabled. The toggle must be ON for conditions to activate.
- Clear browser cache. Cached JavaScript may prevent updated conditions from working.
- Check browser console. Look for JavaScript errors that might block conditional logic execution.
- Verify field type compatibility. Text-based fields require exact matching. Selection fields work best with “Equal To” operator.
Field Not Hiding When Expected
- Verify action setting. Confirm you’re using “Not Equal To” operator for exclusion logic.
- Check for conflicting conditions. Multiple conditions on the same field might conflict. Review all conditions.
- Test condition logic. Remember that multiple conditions use OR logic — if any condition is met, the field shows.
- Simplify and test. Remove conditions one by one to identify which rule causes the problem.
Conditions Work on Desktop But Not Mobile
- Test actual devices. Browser emulation doesn’t always match real mobile behavior.
- Check touch vs click events. Some conditions may trigger on click but not touch. Test both interaction types.
- Verify responsive CSS. Theme CSS might hide or move elements on mobile, interfering with conditions.
- Check JavaScript errors. Mobile browsers may handle JavaScript differently. Check mobile console for errors.
Price Not Updating When Fields Show/Hide
- Understand hidden field pricing. Hidden fields typically exclude their prices from the total.
- Verify pricing configuration. Ensure prices are set on conditional fields.
- Check price update triggers. Confirm your theme’s JavaScript updates totals when fields change.
- Clear all caches. Server cache, browser cache, and plugin cache can all cause stale behavior.
Text Field Conditions Not Working
- Remember exact matching. Text and Textarea fields require exact value matching. Case-sensitive and must match character-for-character.
- Check for extra spaces. Leading or trailing spaces in the comparison value will cause mismatches.
- Textarea considerations. When using Textarea as a trigger field, the entire content must match exactly, including line breaks, spaces, and special characters.
- Use selection fields when possible. Dropdowns and radio buttons are more reliable for conditional logic than text inputs.
Frequently Asked Questions
Find answers to commonly asked questions about our products and services.
Still have a question?
If you have any other queries, feel free to reach out to us. Our knowledgeable team is here to help!
Conclusion
Conditional Logic transforms static product forms into intelligent, responsive experiences. By showing only relevant fields based on customer choices, you reduce confusion, streamline the purchase process, and create a more professional shopping experience. Simple rule building, real-time updates, and support for most field types make Conditional Logic an essential tool for any WooCommerce store offering customizable products.
WPActPro enables merchants to create dynamic, user-friendly product forms that adapt to customer needs automatically.
Related Resources
- Section Settings Documentation – Configure section layout, styling, display rules, and organization for your product addons.
- Field Types Overview – Complete guide to all available field types and their configuration options.