ImageSwitcher
Introduction
Visual product customization is essential for WooCommerce stores selling products where appearance matters. When customers can see exactly what they’re choosing—whether it’s a fabric pattern, color finish, or design style—they make more confident purchasing decisions. WooCommerce image switcher functionality transforms text-based product options into visual, clickable image selections that improve customer experience and reduce returns.
Instead of asking customers to imagine what “Ocean Blue” or “Marble Finish” looks like, WooCommerce image switcher shows them actual images. This visual approach reduces confusion, increases confidence, and leads to fewer returns and higher customer satisfaction.
In this comprehensive guide, we will explain what WooCommerce image switcher is, explore why it’s essential for your store, show you how to implement image swatches, and provide best practices for creating effective visual product options.
What Is WooCommerce Image Switcher?
WooCommerce image switcher is a field type that allows customers to select product options by clicking on visual image thumbnails instead of text dropdowns or radio buttons. This creates a more engaging, intuitive shopping experience, especially for products where visual representation matters.
Key Characteristics
- Visual Selection: Customers click on images rather than reading text options
- Image Thumbnails: Each option displays as a clickable image thumbnail
- Option Labels: Text labels accompany images for clarity and accessibility
- Single or Multiple Selection: Can be configured for one choice or multiple selections
- Per-Option Pricing: Each image option can have its own price adjustment
- Drag-and-Drop Ordering: Easy reordering of options in the admin
WooCommerce image switcher transforms static product forms into dynamic, visual interfaces that help customers make informed decisions quickly and confidently.
Why Your Store Needs Image Swatches
- Improved Customer Confidence – When customers can see exactly what they’re choosing, they feel more confident about their purchase. Visual confirmation reduces uncertainty and helps customers understand what they’ll receive, leading to higher satisfaction and fewer returns. WooCommerce image switcher eliminates the guesswork that comes with text-only options like “Ocean Blue” or “Floral Pattern,” ensuring customers know exactly what they’re selecting.
- Faster Decision Making – Visual options are processed faster by the human brain than text. Customers can quickly scan image swatches and make selections without reading through long lists of text options. This speeds up the purchasing process and reduces cart abandonment. WooCommerce image switcher makes product customization faster and more intuitive, especially for customers who prefer visual information over text descriptions.
- Reduced Returns and Exchanges – When customers can see what they’re choosing, they’re less likely to receive something that doesn’t match their expectations. This reduces returns, exchanges, and customer service inquiries, saving time and money. WooCommerce image switcher helps set accurate expectations, ensuring customers receive products that match their visual selections.
- Professional Appearance – Visual product options create a modern, professional appearance that builds trust with customers. Stores that use WooCommerce image switcher appear more polished and customer-focused than those relying solely on text options.
- Better Mobile Experience – On mobile devices, tapping images is easier and more intuitive than selecting from dropdown menus or small radio buttons. WooCommerce image switcher pro
- Increased Conversion Rates – Visual product options can increase conversion rates by making the selection process more engaging and less intimidating. Customers are more likely to complete purchases when they can see their options clearly.
Use Cases for Image Swatches
Apparel & Fashion – WooCommerce image switcher is essential for fashion and apparel stores:
- Fabric Patterns and Textures: Show actual fabric swatches for clothing materials
- Print Designs: Display t-shirt designs, patterns, and graphics visually
- Shoe Styles and Colors: Let customers see shoe variations before selecting
- Jewelry Finishes: Show gold, silver, rose gold, and other finishes
- Accessory Options: Display bag styles, belt designs, and jewelry variations
Home & Furniture – Home and furniture stores benefit from visual material and finish selection:
- Material Options: Show wood grain, leather textures, and fabric samples
- Finish Types: Display matte, gloss, brushed, and other finish options
- Pattern Selections: Let customers see upholstery patterns and designs
- Tile and Flooring: Display actual tile and flooring samples
- Paint Colors: Show color swatches for furniture and home decor
Print & Stationery – Print and stationery businesses use WooCommerce image switcher for:
- Paper Texture Options: Show different paper textures and finishes
- Font Style Previews: Display font options visually
- Border and Frame Designs: Let customers see border and frame options
- Envelope Liner Patterns: Show envelope liner designs
- Design Templates: Display available design templates
Food & Gifts – Food and gift businesses use image swatches for:
- Cake Decoration Styles: Show cake decoration and frosting options
- Gift Wrapping Options: Display wrapping paper and ribbon choices
- Box Designs: Show gift box styles and designs
- Chocolate Assortment Selections: Display chocolate variety options
- Packaging Choices: Show different packaging and presentation options
Electronics & Accessories – Electronics stores use WooCommerce image switcher for:
- Phone Case Designs: Show phone case patterns and styles
- Laptop Skin Patterns: Display laptop skin designs
- Watch Band Styles: Show watch band options visually
- Headphone Colors: Display headphone color variations
- Accessory Finishes: Show different finishes for tech accessories
Image Switcher Features Overview (Free vs Premium)
| Feature | Free | Premium |
|---|---|---|
| Basic Image Switcher | ❌ | ✅ |
| Single Selection | ❌ | ✅ |
| Multiple Selection | ❌ | ✅ |
| Per-Option Pricing | ❌ | ✅ |
| Option Labels | ❌ | ✅ |
| Drag-and-Drop Ordering | ❌ | ✅ |
| Conditional Logic Integration | ❌ | ✅ |
| Custom Image Sizes | ❌ | ✅ |
Note: Image Switcher is a Premium-only feature of Extra Product Options for WooCommerce. The free version does not include image switcher functionality.
How to Add Image Switcher Fields (Step-by-Step)
Note: Image Switcher is a Premium feature of Extra Product Options for WooCommerce.
- Step 1: Create an Options Group
- Navigate to WooCommerce > Products > Extra Product Addons in your WordPress admin
- Click “Add New” to create a new options group
- Give it a descriptive name like “Pattern Selection” or “Material Options”
- Configure general settings for the options group
- Step 2: Add an Image Switcher Field
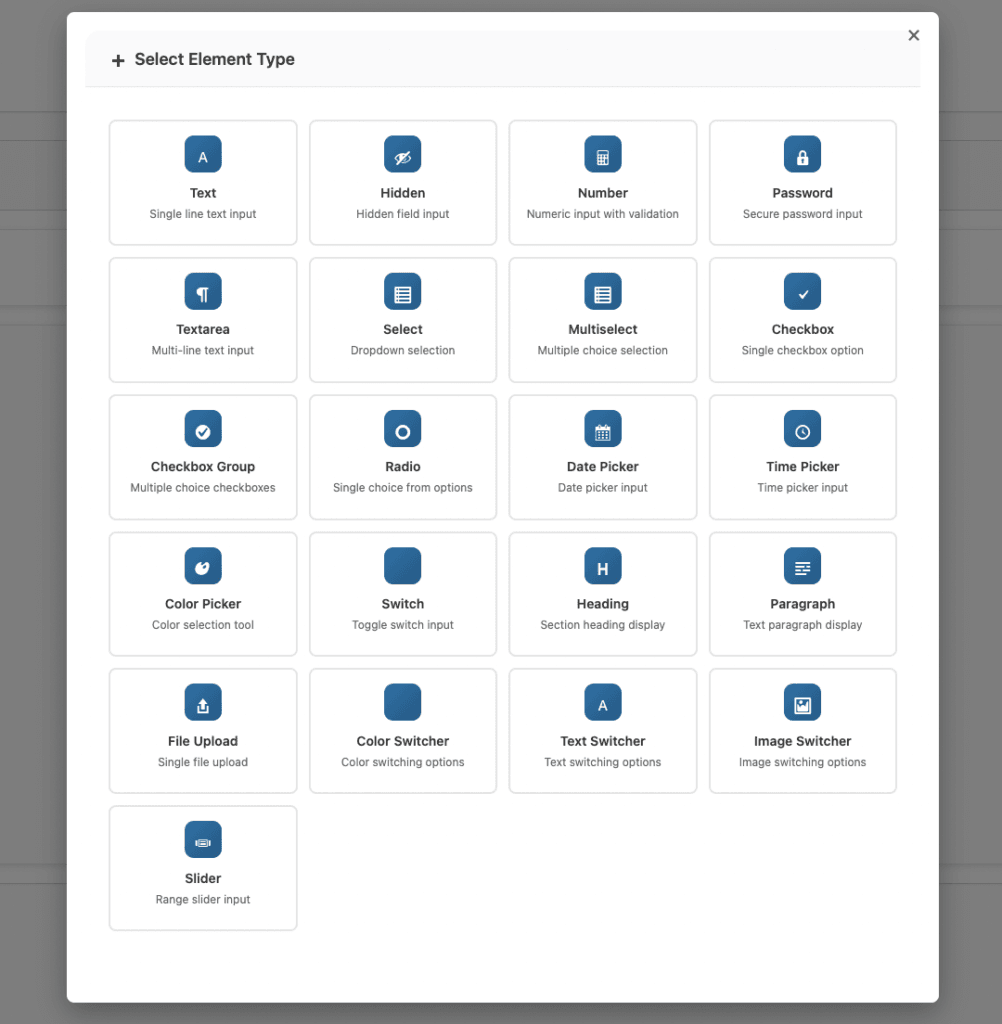
- Click “Add Element” or the “+” button to add a new field
- Select “Image Switcher” from the available field types
- The image switcher field will appear in your field list
- Configure basic field settings:
- Field Status: Enable the field
- Field Name: Set a unique identifier (e.g., “pattern_switcher”)
- Field Label: Enter the label customers will see (e.g., “Choose Your Pattern”)
- Field ID: Assign an ID for styling and scripting purposes
- Required: Check this if selection is mandatory
- Step 3: Configure Image Options
- For each option in your WooCommerce image switcher, configure the following:
- Image Upload
- Click “Upload Image” or “Select Image” for each option
- Choose an image from your media library or upload a new one
- For best results, use consistent image dimensions (e.g., 150x150px or 200x200px)
- Optimize images for web to ensure fast loading times
- Option Label
- Enter a descriptive label for each option (e.g., “Floral Pattern” or “Ocean Blue”)
- Keep labels short and clear
- Use consistent naming conventions across all options
- Pricing Configuration
- Price Type: Choose how the price is calculated:
- No Price: Option is free (included in base price)
- Fixed Price: Adds a specific amount (e.g., +$5.00)
- Percentage: Adds a percentage of base price (e.g., +10%)
- Price Amount: Enter the price adjustment value
- Each option can have different pricing
- Price Type: Choose how the price is calculated:
- Image Upload
- For each option in your WooCommerce image switcher, configure the following:
- Step 4: Add Multiple Options
- Click “Add Option” to add more image choices
- Upload an image for each new option
- Enter labels and pricing for each option
- Repeat until you have all desired options
- Step 5: Reorder Options
- Use the drag handle on the left side of each option row
- Drag options to reorder them
- The order in the admin determines the display order on the product page
- Step 6: Configure Selection Settings
- Allow Multiple Selection:
- Disabled (Default): Customers can select only one option (like radio buttons)
- Enabled: Customers can select multiple options (like checkboxes)
- Each selected option adds its price to the total
- Selection Behavior:
- Single selection: Clicking a new image deselects the previous one
- Multiple selection: Each click toggles selection on/off
- Allow Multiple Selection:
- Step 7: Assign to Products
- In the options group settings, select which products should use this WooCommerce image switcher field
- You can assign to:
- Specific products
- Product categories
- All products
- Save the options group
- Step 8: Test the Image Switcher
- Visit your product page as a customer
- Test clicking on different image options
- Verify that selections work correctly (single or multiple)
- Check that pricing updates correctly when options are selected
- Test on mobile devices to ensure images are tappable
- Complete a test order to ensure selections appear in cart and checkout
Image Switcher Settings Explained
- Allow Multiple Selection
- Single Selection (Default):
- Works like radio buttons
- Customers choose ONE option
- Clicking a new image deselects the previous one
- Best for mutually exclusive options (e.g., choosing one color)
- Multiple Selection:
- Works like checkboxes
- Customers can select MULTIPLE options
- Each selected option adds to the cart
- Prices accumulate for all selections
- Best for add-ons and complementary options (e.g., selecting multiple patterns)
- Image Upload Requirements
- Each option requires an image. For best results with WooCommerce image switcher:
- Consistent Dimensions: Use the same size for all images in a field
- Recommended Sizes:
- Small swatches: 50x50px to 100x100px
- Medium swatches: 150x150px (recommended)
- Large previews: 200x200px or larger
- Square Format: Square images work best for uniform appearance
- File Optimization: Compress images for web (keep under 100KB per swatch)
- Supported Formats: JPG, PNG, GIF, and WebP
- Transparency: PNG recommended for images with transparency
- Each option requires an image. For best results with WooCommerce image switcher:
- Option Labels
- The text that appears below or near each image in your WooCommerce image switcher:
- Purpose: Helps customers understand what each image represents
- Accessibility: Important for screen readers and SEO
- Best Practices:
- Keep labels short and descriptive
- Use consistent naming conventions
- Include material or color information when relevant
- Make labels clear and easy to understand
- The text that appears below or near each image in your WooCommerce image switcher:
- Pricing per Option
- Each image option in your WooCommerce image switcher can have its own price:
- No Price:
- Option is free (included in base product price)
- Use for standard options that don’t affect pricing
- Fixed Price:
- Adds a specific amount (e.g., +$5.00 or -$2.00)
- Use for options with consistent pricing
- Example: Premium finish adds $10.00
- Percentage:
- Adds a percentage of base price (e.g., +10% or -5%)
- Use for options that scale with product price
- Example: Premium material adds 15% to base price
- No Price:
- Each image option in your WooCommerce image switcher can have its own price:
- Single Selection (Default):
Best Practices for Image Swatches
- Use Consistent Image Sizes
- All images in a WooCommerce image switcher field should be the same dimensions. Inconsistent sizes create a messy, unprofessional appearance that can reduce customer trust.
- Recommended Approach:
- Choose one size for all images in a field (e.g., 150x150px)
- Use image editing software to resize images before uploading
- Maintain aspect ratio to avoid distortion
- Show Accurate Representations
- Images should accurately represent what customers will receive:
- Use Actual Product Photos: When possible, use photos of actual products rather than stock images
- Match Colors Precisely: Ensure colors in images match the actual product colors
- Show Textures Clearly: Display textures and patterns accurately
- Update Regularly: Keep images current if products change
- Images should accurately represent what customers will receive:
- Optimize for Performance
- Large image files slow down your page and hurt user experience:
- Compress Images: Use image compression tools before uploading
- Use WebP Format: When supported, WebP provides better compression
- Keep File Sizes Small: Aim for under 100KB per swatch image
- Lazy Loading: Consider lazy loading for image swatches on long pages
- Large image files slow down your page and hurt user experience:
- Add Descriptive Labels
- Even with images, labels help customers understand their options:
- Name the Option: Include color, pattern, or material name
- Include Material Information: Add details about materials when relevant
- Help Accessibility: Labels are essential for screen readers
- SEO Benefits: Labels can help with search engine optimization
- Even with images, labels help customers understand their options:
- Limit Options Wisely
- Too many choices can overwhelm customers:
- Optimal Range: Show 4-8 options per field for best results
- Group Similar Options: Use multiple fields for different categories
- Prioritize Popular Options: Show most popular choices first
- Use Conditional Logic: Show different options based on other selections
- Too many choices can overwhelm customers:
- Consider Mobile Users
- Test how WooCommerce image switcher appears on mobile devices:
- Tappable Size: Ensure images are large enough to tap easily
- Spacing: Check spacing between options for comfortable tapping
- Readability: Verify labels are readable on small screens
- Touch Targets: Ensure touch targets meet accessibility guidelines (minimum 44x44px)
- Test how WooCommerce image switcher appears on mobile devices:
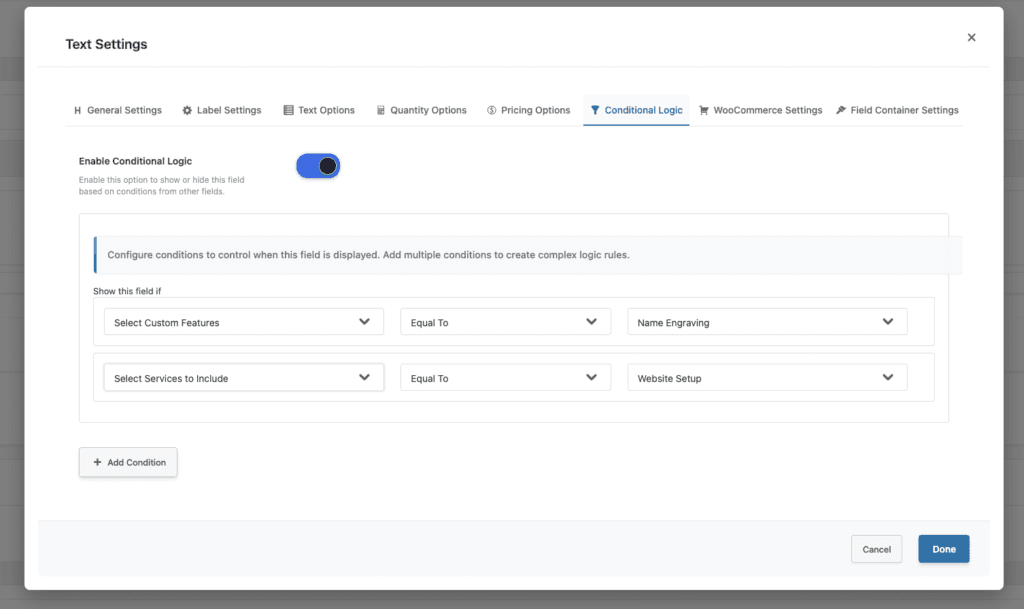
- Combine with Conditional Logic
- Show different image options based on customer selections:
- Material-Based Options: Display fabric patterns only when “Fabric” material is selected
- Style-Based Colors: Show color options based on product style selection
- Variation-Specific: Hide certain options for specific product variations
- Tiered Selection: Show premium options only when base option is selected
- Show different image options based on customer selections:
- Test User Experience
- Regularly test your WooCommerce image switcher from a customer perspective:
- Selection Clarity: Ensure it’s clear which option is selected
- Visual Feedback: Check that selected options are visually distinct
- Price Updates: Verify prices update correctly when options change
- Cart Integration: Confirm selections appear correctly in cart and checkout
- Regularly test your WooCommerce image switcher from a customer perspective:
Common Mistakes to Avoid
- Inconsistent Image Sizes – Using different sizes for images in the same WooCommerce image switcher field creates a messy appearance. Always use consistent dimensions for all images in a field.
- Poor Image Quality – Low-quality or blurry images reduce customer confidence. Use high-quality, clear images that accurately represent your products.
- Too Many Options – Showing too many image options (more than 8-10) can overwhelm customers. Limit options or use multiple fields to organize choices.
- Missing Labels – Relying solely on images without labels can confuse customers and hurt accessibility. Always include descriptive labels for each option.
- Ignoring Mobile Experience – Not testing WooCommerce image switcher on mobile devices can result in poor mobile experience. Always test and optimize for mobile users.
- Unclear Selection State – If selected options aren’t clearly indicated, customers may be confused about their choices. Ensure selected options have clear visual feedback.
Troubleshooting Image Switcher Issues
- Issue: Images Not Displaying
- Possible Causes:
- Images not uploaded correctly
- Incorrect image URLs
- Plugin conflicts
- Theme compatibility issues
- Solutions:
- Verify images are uploaded to media library
- Check image URLs in field settings
- Deactivate other plugins to test for conflicts
- Test with default WordPress theme
- Possible Causes:
- Issue: Images Appear Different Sizes
- Possible Causes:
- Images uploaded with different dimensions
- CSS styling issues
- Theme overriding image sizes
- Solutions:
- Resize all images to same dimensions before uploading
- Check CSS for image size overrides
- Use consistent image dimensions (e.g., 150x150px)
- Test with different themes
- Possible Causes:
- Issue: Selection Not Working
- Possible Causes:
- JavaScript errors
- Plugin conflicts
- Theme compatibility issues
- Browser cache issues
- Solutions:
- Check browser console for JavaScript errors
- Clear browser cache and test again
- Deactivate other plugins to test for conflicts
- Test in different browsers
- Possible Causes:
- Issue: Prices Not Updating
- Possible Causes:
- Pricing configuration errors
- JavaScript not loading
- Cart calculation issues
- Solutions:
- Verify pricing settings for each option
- Check that JavaScript is loading correctly
- Test cart calculation functionality
- Review WooCommerce pricing settings
- Possible Causes:
Conclusion
WooCommerce image switcher transforms how customers interact with product options by replacing text-based selections with visual, clickable images. This creates a more engaging, intuitive shopping experience that improves customer confidence, reduces returns, and increases conversion rates.
Whether you sell apparel, furniture, print products, or electronics, WooCommerce image switcher helps customers make informed decisions by showing them exactly what they’re choosing. With proper configuration, consistent image sizing, and attention to mobile experience, WooCommerce image switcher becomes an essential tool for visual product customization.
Start with basic image switcher functionality, then explore advanced features like multiple selection, conditional logic integration, and custom pricing as your needs grow. Properly configured WooCommerce image switcher fields improve customer satisfaction, reduce support inquiries, and help your business operate more efficiently.
Related Resources
Frequently Asked Questions
Find answers to commonly asked questions about our products and services.
Still have a question?
If you have any other queries, feel free to reach out to us. Our knowledgeable team is here to help!