

Quantity Settings
Enable quantity selection for addon fields, allowing customers to specify how many of each option they want. Perfect for personalization services, bulk addons, or any scenario where quantity matters.
Quantity Settings allow you to add quantity controls to any addon field, giving customers the ability to specify how many of each option they want. Whether it’s multiple personalizations, bulk quantities, or per-item addons, quantity settings give you flexible control over how quantities work.
These settings help you:
- Enable quantity selection — Add quantity inputs to any addon field
- Sync with product quantity — Link addon quantity to main product quantity
- Set quantity limits — Control minimum and maximum quantities
- Set default values — Pre-fill quantity for better UX
- Calculate pricing — Quantity affects pricing calculations automatically
Core Capabilities
- Flexible Quantity Control – Enable quantity for any addon field type. Customers can select how many of each option they want, and pricing adjusts automatically.
- Product Quantity Sync – Link addon quantity directly to the main product quantity. When customers change product quantity, addon quantity updates automatically.
- Quantity Limits – Set minimum and maximum quantities to control customer selections and prevent invalid orders.
- Default Values – Pre-fill quantity fields with sensible defaults, improving user experience and reducing clicks.
- Automatic Pricing – Quantity multiplies with field pricing automatically. If an option costs $5 and quantity is 3, total addon price is $15.
How It Works
Quantity Settings work at the field level, allowing you to configure quantity behavior for each addon field independently. When enabled, a quantity input appears next to the field, and pricing calculations automatically account for the selected quantity.
Enable Quantity → Configure Options → Quantity Input Appears → Pricing Updates
The quantity input appears when a field option is selected, and pricing recalculates in real-time as customers adjust quantities.
Simple Example
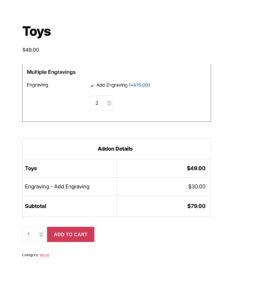
Imagine an engraving addon:
- Without Quantity: Customer selects “Add Engraving (+$10)” — one engraving per product
- With Quantity: Customer selects “Add Engraving (+$10)” and sets quantity to 3 — three engravings, total $30
This allows customers to order multiple personalizations or addons per product.
Quick Start Guide
Enable and configure quantity settings for your addon fields in 3 minutes.
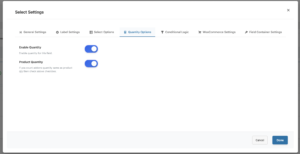
- Step 1: Access Field Settings – Navigate to WooCommerce → Products → Extra Product Addons in your WordPress admin. Open the addon containing the field you want to configure, or create a new addon.
- Step 2: Select the Field – Click on the field you want to configure. The field settings modal will open.
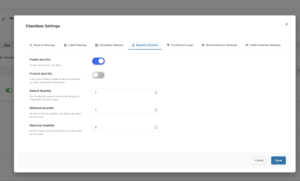
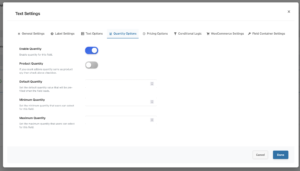
- Step 3: Open Quantity Settings Tab – In the field settings popup, click the “Quantity Options” tab. This tab is only available in the Premium version.
- Step 4: Enable Quantity – Toggle the “Enable Quantity” switch to ON. Additional quantity options will appear below.
- Step 5: Configure Quantity Options
- Choose your quantity behavior:
- Option A: Sync with Product Quantity
- Toggle “Product Quantity” to ON
- Addon quantity automatically matches product quantity
- No need to set default, min, or max (they’re hidden when Product Quantity is enabled)
- Option B: Independent Quantity
- Leave “Product Quantity” OFF
- Set “Default Quantity” (e.g., 1)
- Also, Set “Minimum Quantity” (e.g., 1) — optional
- Set “Maximum Quantity” (e.g., 10) — optional
- Option A: Sync with Product Quantity
- Choose your quantity behavior:
- Step 6: Save and Test
- Click “Done” to close the field settings. Click “Save” to save your addon. Visit your product page, select a field option, and verify the quantity input appears and pricing updates correctly.
- Pro Tip: Test with different quantities to ensure pricing calculations work correctly, especially with price-per-value or custom formulas.
Settings Reference
- Enable Quantity
- Purpose: Master toggle to enable quantity selection for this addon field.
- When to Use:
- When customers need to order multiple of the same addon option
- For personalization services where quantity matters
- Bulk addons where customers specify how many they want
- Per-item addons that should multiply with quantity
- How It Works:
- When enabled, a quantity input field appears next to the addon field
- Quantity input only appears after a field option is selected
- Quantity affects pricing calculations automatically
- Works with all pricing types (fixed, percentage, price-per-value, custom formulas)
- Example:
- Before: Customer selects “Premium Engraving (+$25)” — one engraving
- After: Customer selects “Premium Engraving (+$25)” and sets quantity to 2 — two engravings, $50 total
- Product Quantity
- Purpose: Sync addon quantity with the main product quantity.
- When to Use:
- When addon quantity should match product quantity exactly
- Personalization services where each product unit needs the addon
- Scenarios where addon is tied to product quantity
- Simplifying quantity management for customers
- How It Works:
- When enabled, addon quantity automatically matches product quantity
- If customer changes product quantity from 2 to 5, addon quantity updates to 5
- Quantity input is hidden (since it syncs automatically)
- Default, Min, and Max quantity settings are hidden (not needed when syncing)
- Example:
- Product quantity: 3
- Addon with “Product Quantity” enabled: Quantity automatically set to 3
- If customer changes product quantity to 5, addon quantity becomes 5
- Important: When “Product Quantity” is enabled, Default, Minimum, and Maximum quantity settings are not available (they’re automatically synced with product quantity).
- Default Quantity
- Purpose: Set the starting quantity value that appears when the field option is first selected.
- When to Use:
- To pre-fill quantity with a sensible default (usually 1)
- Improve user experience by reducing clicks
- Set expected quantity for common use cases
- Guide customers toward typical quantities
- How It Works:
- Only available when “Product Quantity” is OFF
- Pre-fills the quantity input when field option is selected
- Customers can still change the quantity
- Must be within Min/Max limits if set
- Example:
- Default Quantity: 1
- Customer selects “Add Engraving” → Quantity input shows “1” automatically
- Customer can increase to 2, 3, etc., or decrease if minimum allows
- Best Practice: Set default to 1 for most scenarios, as customers typically want one addon per selection initially.
- Minimum Quantity
- Purpose: Set the minimum quantity customers can select for this addon field.
- When to Use:
- To require minimum order quantities
- Prevent zero or negative quantities
- Enforce business rules (e.g., minimum 2 for bulk pricing)
- Ensure valid order quantities
- How It Works:
- Only available when “Product Quantity” is OFF
- Prevents customers from selecting quantities below the minimum
- Quantity input enforces the minimum value
- Validation prevents checkout if quantity is below minimum
- Example:
- Minimum Quantity: 2
- Customer cannot select 0 or 1
- Minimum selectable quantity is 2
- Quantity input starts at minimum if default is below minimum
- Best Practice: Set minimum to 1 for most scenarios to prevent zero quantities. Use higher minimums for bulk or special pricing tiers.
- Maximum Quantity
- Purpose: Set the maximum quantity customers can select for this addon field.
- When to Use:
- To limit maximum order quantities
- Prevent excessive orders that can’t be fulfilled
- Enforce inventory or production limits
- Control order size for special offers
- How It Works:
- Only available when “Product Quantity” is OFF
- Prevents customers from selecting quantities above the maximum
- Quantity input enforces the maximum value
- Validation prevents checkout if quantity exceeds maximum
- Example:
- Maximum Quantity: 10
- Customer cannot select more than 10
- Quantity input stops at maximum
- Useful for limited-time offers or production capacity limits
- Best Practice: Leave empty for unlimited quantities, or set based on your fulfillment capacity or business rules.
Real-World Examples
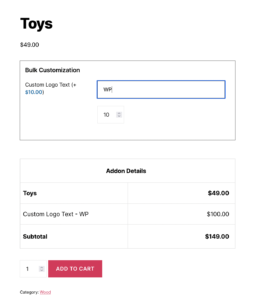
Jewelry Store: Multiple Engravings
Scenario: Allow customers to order multiple engravings per product.
Configuration:
- Enable Quantity: ON
- Product Quantity: OFF
- Default Quantity: 1
- Minimum Quantity: 1
- Maximum Quantity: 5
Customer Experience:
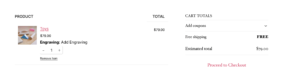
- Customer selects “Add Engraving (+$15)”
- Quantity input appears with default value of 1
- Customer can increase to 2, 3, 4, or 5 engravings
- Pricing: 1 engraving = $15, 2 engravings = $30, etc.
Result: Customers can order multiple personalizations per product with clear quantity control.
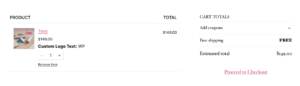
Print Shop: Bulk Customization
Scenario: Sync addon quantity with product quantity for bulk orders.
Configuration:
- Enable Quantity: ON
- Product Quantity: ON (synced with product quantity)
Customer Experience:
- Customer orders 10 products
- Product quantity: 10
- Addon “Custom Logo” automatically has quantity 10
- If customer changes product quantity to 20, addon quantity becomes 20
Result: Addon quantity automatically matches product quantity, perfect for bulk personalization.

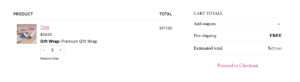
Gift Shop: Limited Quantity Offers
Scenario: Limit gift wrapping quantity to prevent over-ordering.
Configuration:
- Enable Quantity: ON
- Product Quantity: ON
Customer Experience:
- When a customer selects “Premium Gift Wrap (+$8)”, a separate quantity input does not appear, as the add-on quantity is based on the main product quantity.
Result: If the customer selects a product quantity of 3, the add-on quantity is also automatically applied as 3.
Best Practices
- Do This
- Use Product Quantity sync when appropriate. If addon quantity should always match product quantity, use “Product Quantity” sync to simplify the experience.
- Set sensible defaults. Default quantity of 1 works for most scenarios. Only change if your use case requires a different default.
- Set minimum quantities. Always set a minimum of 1 to prevent zero quantities, unless your business case specifically allows zero.
- Test pricing calculations. Verify that quantity multiplies correctly with your pricing type (fixed, percentage, price-per-value, custom formulas).
- Consider user experience. Don’t set maximums too low unless necessary — customers should be able to order what they need.
- Document quantity behavior. If quantity has special meaning (hours, units, etc.), make it clear in field labels or descriptions.
- Avoid This
- Don’t enable quantity unnecessarily. Only enable quantity if customers actually need to specify multiple of the same option.
- Don’t set conflicting limits. Ensure minimum quantity is not greater than maximum quantity, and default is within the min/max range.
- Don’t forget to test. Always test quantity functionality with different values to ensure pricing and validation work correctly.
- Don’t ignore product quantity sync. If addon should match product quantity, use the sync feature instead of manual quantity management.
- Don’t set unrealistic maximums. Setting maximum too low can frustrate customers. Only set limits when necessary for business reasons.
- Don’t mix quantity with incompatible pricing. Some pricing types (like fixed) work better with quantity than others. Test to ensure calculations are correct.
Troubleshooting
Quantity Input Not Appearing
- Check Enable Quantity setting. Ensure “Enable Quantity” is toggled ON for the field.
- Verify field option is selected. Quantity input only appears after a field option is selected. Select an option first.
- Clear browser cache. Cached JavaScript may prevent quantity input from appearing.
- Check Premium version. Quantity Settings are Premium-only features. Ensure you’re using the Premium version.
- Verify field is saved. Ensure you clicked “Done” and “Save” after enabling quantity.
Quantity Not Syncing with Product Quantity
- Check Product Quantity setting. Ensure “Product Quantity” is toggled ON for the field.
- Verify product quantity exists. Product must have a quantity input for sync to work.
- Clear cache. Browser and WordPress cache can prevent sync from working.
- Check JavaScript errors. Open browser console and look for errors that might prevent sync.
Pricing Not Updating with Quantity
- Verify quantity is enabled. Quantity must be enabled for pricing to multiply.
- Check pricing type. Some pricing types multiply with quantity automatically. Verify your pricing type supports quantity multiplication.
- Test with different quantities. Try different quantity values to see if pricing updates.
- Clear all caches. Server cache, browser cache, and plugin cache can all cause stale pricing.
- Check browser console. Look for JavaScript errors that might prevent price updates.
Minimum/Maximum Not Enforcing
- Verify settings are saved. Ensure you clicked “Done” and “Save” after setting min/max values.
- Check Product Quantity setting. Min/Max are only available when “Product Quantity” is OFF. If Product Quantity is ON, min/max are not used.
- Clear cache. Cached validation rules may not reflect updated min/max settings.
- Test on frontend. Min/max validation happens on the frontend — test on the actual product page.
Default Quantity Not Working
- Check Product Quantity setting. Default quantity is only available when “Product Quantity” is OFF.
- Verify default value. Ensure default quantity is set to a valid number (not empty, not negative).
- Clear cache. Cached field data may not reflect updated default values.
- Test field selection. Default quantity appears when field option is first selected.
Frequently Asked Questions
Find answers to commonly asked questions about our products and services.
Still have a question?
If you have any other queries, feel free to reach out to us. Our knowledgeable team is here to help!
Conclusion
Quantity Settings transform basic addon fields into flexible, quantity-aware options. By allowing customers to specify how many of each addon they want, you enable bulk ordering, multiple personalizations, and per-item addons with automatic pricing calculations. Simple configuration, real-time price updates, and support for all field types make Quantity Settings an essential tool for any WooCommerce store offering customizable products.
WPActPro enables merchants to create flexible, quantity-aware addon fields that calculate pricing automatically based on customer selections.
Related Resources
- Section Settings Documentation – Configure section layout, styling, display rules, and organization for your product addons.
- Field Types Overview – Complete guide to all available field types and their configuration options.